While getting ready for my first long trip in my Roadtrek van, I decided to check the roof of the 5th wheel (my main home) and found the upper front 12 feet in somewhat bad shape. I had repaired the lower portion previously with new wood and a thick plastic like covering the RV repair place now uses over the rubber membrane.
The upper roof appeared to have a coating applied over the membrane which had split in several places and the coating was now flaking. The roof was black in spots and hot as hell! It was not leaking. Yet. Unfortunately, RV shops were already booked up and my time was running short to head out on my trip for which I already had an appointment to meet someone in Utah to get some work done on my van. I decided to go the roof coating route for the repair and bought Henry’s Tropicool at Home Depot. The cost to coat a roof yourself is very low at around $300 including throw away tools such as cheap roller covers, 3″-4″ paint brushes, a roller extension rod, gloves, etc. You can’t clean this stuff up afterward so you will have to use new ones for each coat. I put 2 coats on.
To put it on, you need to do it in the cool of the morning or evening and it should not be windy. The wind delayed me several days. First I scraped the old caulk off the front seam across. Not fun. The black got on my shoes and left shoe prints everywhere that I had to clean up when done. I taped over the seam with an Eternabond equivalent and caulked the edges down. I inspected the caulking around the vents and it was decent so I left it but added some of the tape again.
I washed the roof well and had someone on the ground with a hose to spray the sides as it dripped down so they didn’t get black streaks.
To start the coating, I used a paintbrush to go along the edges and around the vents. I then switched to a roller on an extension pole and a paint pan to roll it on front to back. It went on easily but you have to be careful near the edges so it doesn’t drip down the side or block up the rain gutters. I waited 24 hours and used a new roller cover and paintbrush to do the second coat.
It looks great and the roof is now much cooler than it was. No leaks. Going with a roof coating I will need to redo it again in a year or two but it is not expensive and the next time should be even easier. I’ll watch it for deterioration over time and may or may not replace that part of the roof eventually.
For two coats on my 8′ x 12′ piece of roof that I did, I used 1.5 gallons of roof coating.
Getting ready for my first big trip in my new to me 1992 Roadtrek camper van. My 5th wheel has retired permanently to my leased lot.
The front shocks on the van were bad and had to be replaced. I used Monroe shocks rather than the Bilsteins the Facebook groups were recommending due to my camper van being a 3/4 ton rather than the 1 ton most of them have. Go with the Monroe RV ones if you have a 2500 3/4 ton. I also had them put on a Moog steering stabilizer which definitely helps it go straight and of course an alignment was done. In 1994 and higher models, a Big D steering stabilizer should be added to the steering for better support instead of the Moog.
Later I had the front brakes redone and both calipers replaced since one was sticking. The brake master cylinder reservoir was also leaking so replaced that.
Inside, I replaced the light fixture in the kitchen with an LED one that also provides a USB port. I also added 2 more USB ports and a 12V port above the rear passenger seat. It was not easy adding wires for the ports. I had to snake them through the ceiling and open one side wall to do it. The bulbs in the other light fixtures were also replaced with LEDs to save power for boondocking.
While I was working on adding wires, I found wires had already been run between the roof vent and and the converter to add a powered vent fan. I got a Vortex II off Amazon and installed it. It just shoves up into the current vent after connecting the two wires and is held in place by 2 screws into the metal brace that is already there. It has 3 forward modes (blowing in) and 2 reverse modes (blowing out). Nothing fancy. No rain sensor or remote but it is so easy to reach that I don’t mind. I must say it helps tremendously with the heat buildup inside the van.
A message board was added to one cabinet door for messages when I have a passenger with me and for my own notes to myself.
I screwed a cup holder that would normally sit between car seats in the crevice to the doghouse over the van engine. I also have one with a trash bin and other slots that sits on the floor between seats.
Two bubble levels were added with one over the driver in the center of the cupboard there and one overhead to the side. They make parking level for the fridge to work properly very easy.
Speaking of the fridge, it’s a 3 way but was only working on gas. An RV tech cleaned the rear of it up and told me the control was bad and could not be gotten anymore. I jumped on Ebay and searched for it. It took me a few days but I found one brand new in the bag and ordered it. Be sure to get an American 120V one and not the Australian 240V one. The RV tech had no trouble putting it in and now I have all 3 modes to use and I do use them all! I use AC when provided in camp, DC when driving only (it drains the batteries), and gas when boodocking.
Because I still don’t trust the old fridge and I tend to over-shop on groceries, I knew I also wanted an AC/DC portable compressor fridge which also cools down much faster than an RV absorption fridge. The only place I can put it is where the rear passenger seat/bed is. I removed the seat and put it covered in my garage. Then I cut a sheet of plywood and added some thin would strip stops to it to cover the remaining pedestal and not move around. Above it is the new 12V port I added to run the portable fridge.
The center rafter was missing for the awning and the plastic loop that opens the awning broke. I was able to get the parts from FiammaUSA in Florida. Silly me couldn’t find anywhere to store/mount the rafter other than on the short wall running under the bathroom so I installed the clips for it there. Later someone in one of the Roadtrek Facebook groups mentioned just tossing it in one of the long open cubbies up front that run just below the ceiling. Like duh! It fits easily there.
Due to the TV antenna being built into the ceiling, the Roadtrek has to be oriented right for best reception which you have no control over when in a campground. I added an external antenna that I can clamp onto the side of the van when needed and run the wire inside to the TV.
That’s it for now. Doing what I can to make it fit my camping style. As far as more repairs, even new RVs these days need them right out of the factory and certainly should be expected when purchasing used. Still, I paid very little for this Class B motorhome including the repairs compared to the cost of a new one from $70,000 to $170,000! Roadtreks are particularly popular as well as Chinooks no matter the age and folks drive them into the ground. Who wouldn’t at those new prices?!
In keeping with my posts on emergency food and food storage, I have now found another source for fresh milk. I still use powdered milk a lot and it is my main source for milk when traveling since it does not need to be refrigerated while still in powder form.
However, at home where refrigeration is not an issue at all, I now also use unsweetened original flavor almond milk. To me it tastes the same as cow milk, it is only 30 calories (YES!), and it lasts for months not days!!! Since I don’t normally drink milk, cow milk spoils long before I can use it all in my cooking and lately the date range on it in my local store has gotten very short. So, I tried almond milk and I LOVE it! It works just fine for baking, cooking, and drinking. Best of all, I haven’t had a carton of it go bad on me yet. Cost is also similar to regular milk. This is a solid win!
Be sure to use unflavored or original flavor. Vanilla flavored is terrible for cooking.
NOTE: Not for those with nut allergy nor should it be used around them. Be very careful using it the first time in case of a reaction.
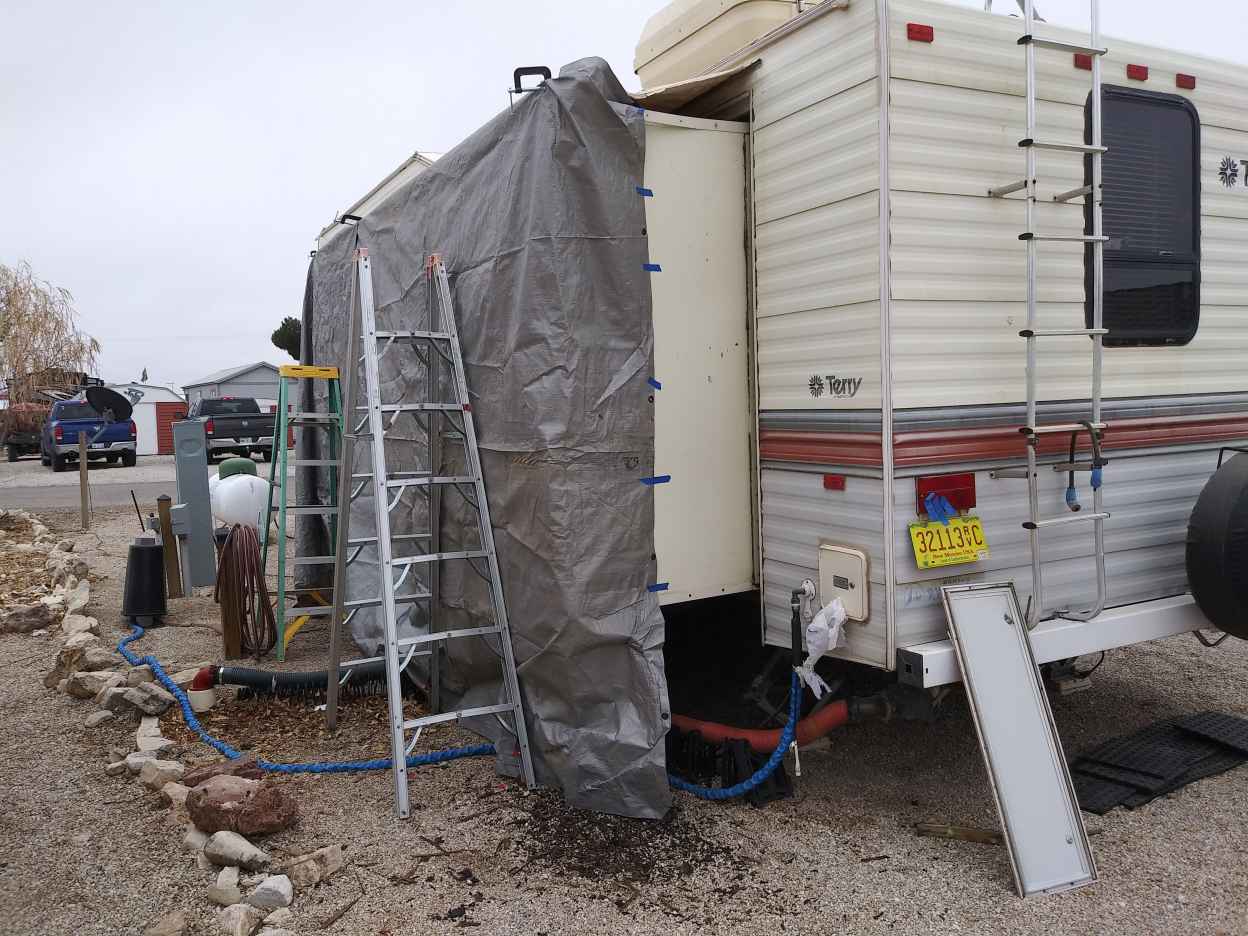
The outside corner of my full living room slideout came loose. The gap continued to widen until it became obvious I had water damage. I called several RV repair places but none of them wanted to touch it. I started searching for newer trailers online and at RV dealers but found prices for both new and used RVs have gone sky high thanks to Covid. My only alternative was to fix the issue myself. As a DIYer with plenty of tools, a garage, and 15 years of RVing experience and knowledge, I knew I had much of what was needed but it was definitely not a one person job. Luckily, my neighbor had the woodworking knowledge I needed and was willing to give it a try (for pay) with me as his assistant doing all the grunge work and cleanup. It also helped that my trailer has a metal skin in small sheets rather than fiberglass.
We started by pulling off the corner bracket and lightly bending the corner sheets back. It became apparent real fast that much more of the slideout was damaged and that it would be easiest to repair by taking off all the slideout siding. We got another neighbor to help hold it up as we released the staples and pulled each of the long, narrow sheets off and laid them in the yard. Thankfully, my RV park was very nice about it. Most would not be. TIP: weight those siding sheets down well so the wind doesn’t twist them and throw them all over the neighborhood. Don’t ask how I know!
We found the leaks had started at the roof line on both sides but not in the middle. We then worked out a plan for the repair, took measurements for the lumber needed, and covered the entire wall with 2 large gray tarps and clamps. We found gray was less offensive to the neighbors than the bright blue tarps.
It took us about a month to finish what with morning cold weather and much needed breaks. Our park loaned us ladders and sawhorses. I got the job of pulling out all the old staples (a ton of them!), painting the new wood, unscrewing the metal corner and roof pieces, cleaning those pieces with Goo Gone and a plastic spatula, general cleanup, getting supplies, and providing an extra hand to hold pieces while my neighbor cut them or put them into place.
We had to remove the windows each day and put them back in with just a couple screws to hold them every night then re-tarp the whole wall.
Before we sealed the wall back up, I remembered how buggered I was not having an electrical outlet next to the couch. I ran down to the RV store and bought an RV outlet then broke into the lighting circuit which runs to both sides of the couch and installed it. I LOVE IT! I also went to the hardware store and bought a new LED light fixture to replace the old partially broken one over the dining table.
The wood sheathing we replaced I painted with a primer and sealer before installing to give the wall a better chance to survive if it leaked again per my wood guy. Most of the inner wall was still intact so we left it alone. The inside of the corner that started it is not so great and could use some more work which I’ll do later. I also need to find the slideout gaskets that were removed to replace them. This trailer is a 1993 and will not be going back out on the road anyway. I just live in it on my own lot with a 99 year lease in an RV park.
We used an electric staple gun to put the siding back on over the wood. It came out pretty good in the end though the metal was dinged up by wind. It will do and the park is happy with it.
UPDATE: Several months later and after several big storms, the slideout has not leaked!


