FTC Disclaimer and Privacy Policy
|
By Katrina Kane, on January 14th, 2008 Located in Fayetteville, NC, this is a must see. Not only do they explain why anyone in their right mind would jump out of a perfectly good airplane, they follow Special Operations thoughout all the major conflicts and give you a real look into what they did (often behind the scenes) and you may learn some things you did not know. This month they also have an exhibit on the OSS intelligence/spy operation which later became the CIA.
For pictures of my visit and comments, click here.
I learned that gadgets like Q made for James Bond are quite real. They did develop tiny explosives, the tiniest 1 bullet gun I have ever seen, explosives that would go off automatically hours after they were gone from an area, etc.
I learned that Grenada was invaded not only to save American medical students from the new communist takeover there but also because they were building an air strip there which threatened both Carribean shipping lanes and the Panama Canal.
When they went to Panama to get Noriega, they also busted an American out of prison there who had been jailed for operating a transmitter to denounce Noriega and his regime. He was guarded by an executioner with orders to kill him if the US tried to get him out. He failed but Special Ops didn’t.
I saw the Cricket clicker used on D-Day to identify troops to one another, planes, helicopters, tanks, ATVs, spy/saboteur devices and weapons, and much more. With the help of a ride in their simulator, I finally got to ski, ride in a helicopter, ride a motorcycle in a fast moving convoy through the desert, and skydive. It was well worth it and it was free though I managed to help support them through their gift shop and the simulator was $4. I now have my Airborne wings! 😉
By Katrina Kane, on January 12th, 2008 As I posted recently, I finally bought myself a GPS device for my car and I have gotten into the sport of Geocaching. Geocaching is a great sport for RVers at home and on the road. It is a world-wide treasure hunt; a chance to sneak around, share secrets, see cool places near you that you may not have noticed, spend time with family or a friend, get some exercise, and maybe be rewarded with a trophy at the end. So far, I have been able to use my Garmin C330 car GPS to find about 17 caches. It has taken me awhile to learn how to best use it for that since geocaching is certainly not it’s main focus but it is working very well for city caches.
Maybe I can save someone else some time by noting what I learned here.
- Garmin devices are designed for download of the cache locations from http://geocaching.com directly or through your free account at their site at http://garmin.com .
- If you download from those sites directly into the device, the names it uses for Favorites is the GCxxxx cache identifier which I personally find unhelpful. I downloaded GSAK and run most through there as .loc or .gpx (premier members) so I can choose to use the cache given names instead which are easier for me to remember such as “Wiley’s Tank”, etc. You can also edit them in the GPS device if you have the time.
- When going to a cache via GPS, be extremely careful as one time it ran me 8 miles around in a circle and then I ended up on a freeway bridge overlooking the road it was on when it said I had arrived. LOL. Did something similar another time when the item was just on the other side of a fence by the freeway. Keep plenty of gas on board and a sense of humor. Use your brain. Continue reading The Wacky World of Geocaching
By Katrina Kane, on December 31st, 2007 Now I know some of you are going to say, “What the heck does that have to do with RVing?”. Well, I have met several Ebayers in RV parks I have stayed at. Being an Ebay seller or running an Internet store are two ways to support your RV lifestyle. It only requires a computer, an Internet connection, basic shipping supplies, and items that can either be drop-shipped or that are small enough and light enough to store and sell from an RV. If you have a a home-base such as a leased pad or house, you likely have storage there for more product which can be shipped to you or picked up when you are in the area.
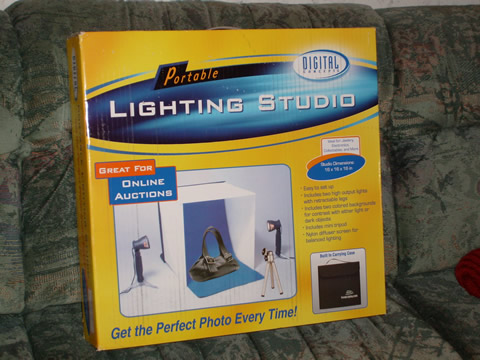
Selling successfully on Ebay requires good product pictures. People want to see what they are buying. You can get a good picture with just your camera and a table, couch, floor etc. A better picture might be on a sheet or fabric background of a solid color. If you want really detailed professional pictures, you need a light box. I have had the plans to build one for some time but I didn’t like the folded down size or weight in my RV so hadn’t made it yet. Tada! In comes Digital Concepts with a truly light, portable, and professional light box you can purchase at Walmart.
 
It looks like an artist’s folio at first look. Open it up and it forms a 16″x16″x16″ light box with non-reflective translucent walls you can shine the 2 included freestanding high output photo lights through for backlighting, a reversible non-reflective background of blue and gray, and a tripod for your camera. The folio has pockets on the outside for the lights and tripod and folds up easily into a very decent size to store easily in any closet or under the bed. Cost is $49.95 which is well worth it if you do a lot of Ebay selling. It is also useful for online stores to add new products. Crafters selling online can look very professional with this.
By Katrina Kane, on December 17th, 2007 Got some great tips I thought I would pass on.
1. Use the sides of the overhead microwave and the overhead stove vent if available to hang things like measuring spoons on stick-on hooks. The little plastic sticky hooks by 3M and others work very well on those, the items will be within easy reach when needed, and will generally stay in place while traveling.
2. Anyone who has cooked in a small RV propane oven knows how the food tends to burn on the bottom. Buy 4 six-inch unglazed ceramic tiles and put them on the solid metal shelf just above the burner to evenly distribute the heat throughout the oven. They must be unglazed and be able to handle high temps so you likely won’t find them at Home Depot type stores. Look for tile dealers.
3. If your rear RV bumper has rusted or does not have enough room for all your sewer hoses, you can buy plastic hose containers from Camping World or you can make your own! I bought one 10 foot white plastic sewer pipe at Lowes hardware store along with additional caps, etc. and made 2 of these for less than the price of one pre-fabbed. Mine don’t have mounting feet but I can still strap them under my trailer, on the rear bumper, or in my case, to the rear ladder. They were very easy to make with just a regular saw needed to cut the pipe and a knife to trim the burrs.
 
If you have the room in one of your storage bays, coiling sewer hoses and cords up in Tupperware was also suggested to me
Continue reading More RV Tips
|
|


